There’s something deeply satisfying about crafting your own snacks-especially when they’re as simple, wholesome, and delicious as homemade granola bars. Say goodbye to the endless aisle of store-bought options packed wiht hidden sugars and preservatives. in this guide, we unlock the secrets to no-bake granola bars that combine wholesome ingredients and effortless prep into a perfect treat for busy mornings, afternoon pick-me-ups, or on-the-go energy boosts. whether you’re a seasoned kitchen pro or a beginner looking for a fuss-free recipe, these bars deliver the perfect balance of taste and nutrition, all without turning on the oven. Let’s dive into creating your new favorite snack-simple, tasty, and entirely your own.
Simple & Tasty Homemade No-Bake Granola Bars Recipe Guide begins by emphasizing quality ingredients as the heart of flavor and nutrition. The secret to crafting irresistible bars is in selecting each component thoughtfully - from wholesome oats to luscious nut butters and vibrant add-ins that awaken the palate. These bars are not only a convenient snack but a canvas to showcase natural tastes and textures fused into one harmonious bite.
Choosing the Perfect Ingredients for flavor and Nutrition
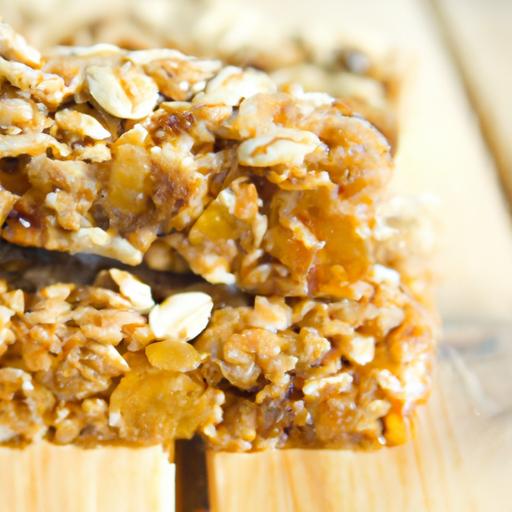
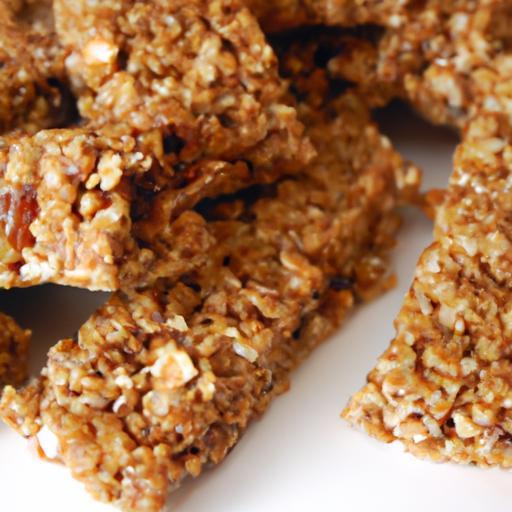
Start with rolled oats – they provide that ideal chewy crunch and a hearty base loaded with fiber and slow-digesting carbohydrates. Opt for raw or toasted nuts like almonds or pecans to add a savory depth plus healthy fats and protein. For natural sweetness, use pure honey or maple syrup, ensuring a moist, sticky binder without refined sugars. The magic ingredient, nut butter, such as creamy almond or classic peanut, binds everything with rich creaminess while contributing essential vitamins and minerals. Enhance your bars with dried fruits like tart cranberries or juicy raisins to inject bursts of color and tanginess. a pinch of sea salt balances sweetness and accentuates flavors, completing the flavor symphony.
Step-by-Step Guide to Crafting Your No-Bake granola Bars
With the perfect ingredients in hand, the process is surprisingly simple, making it ideal for beginners and seasoned foodies alike.
Prep and Cook Time
- Readiness: 15 minutes
- Setting Time: 2 hours (refrigeration)
- Total Time: 2 hours 15 minutes
Yield
- Makes approximately 12 bars
Difficulty Level
- Easy
Ingredients
- 2 cups rolled oats (gluten-free if preferred)
- 1 cup mixed nuts (chopped almonds, walnuts, or pecans)
- ½ cup natural peanut butter or almond butter
- ½ cup honey or pure maple syrup
- ½ cup dried cranberries or raisins
- 1 teaspoon vanilla extract
- ½ teaspoon ground cinnamon
- ¼ teaspoon fine sea salt
Instructions
- Line an 8×8 inch baking pan with parchment paper, allowing edges to overhang for easy removal later.
- In a large bowl,combine the rolled oats,chopped nuts,dried cranberries,cinnamon,and salt. Stir to distribute evenly.
- In a small saucepan over low heat, gently warm the peanut butter and honey until smooth and easily pourable – about 2-3 minutes. Remove from heat and stir in the vanilla extract.
- pour the warm peanut butter mixture over the dry ingredients and fold gently with a spatula, ensuring everything is fully coated and sticky.
- Transfer the mixture into the prepared pan and press firmly with a spatula or your hands to compact it tightly. This step is crucial to prevent crumbly bars.
- Chill in the refrigerator for at least two hours, or until completely set and firm to the touch.
- Lift the bars out using the parchment edges and cut into 12 equal-sized pieces with a sharp knife. Store in an airtight container.
Tips for Customizing Your Bars to Suit Every Palate
Don’t hesitate to make these bars your own! Swap the nuts for seeds like pumpkin or chia to add a nutrient boost and crunch. Try dark chocolate chips or cacao nibs for a hint of indulgence. Feeling tropical? Toss in shredded coconut and dried pineapple pieces. For an extra layer of flavor, add a sprinkle of ground ginger or cardamom into your dry mix. The key is balancing textures: crunchy, chewy, and sticky to delight every bite.
Storage Secrets to Keep Your granola Bars Fresh and Delicious
Proper storage preserves freshness and flavor. Store your granola bars in an airtight container at room temperature for up to five days - just make sure it’s a cool,dry spot. For longer shelf life, refrigerate them up to two weeks or freeze individually wrapped bars for up to three months. To thaw, leave them at room temperature for 30 minutes for an ideal texture that’s soft but still chewy.
Chef’s Notes
- Nut Butter Substitute: use sunflower seed butter if nut allergies are a concern.
- sweetener Tip: Adjust honey or maple syrup quantity for sweetness preference; more syrup means softer bars.
- Avoid Sticky Mess: Lightly oil your spatula or hands when packing the mixture to prevent sticking.
- Make-ahead: Bars keep well and make excellent grab-and-go snacks for busy mornings or post-workout fuel.
Serving Suggestions
Serve chilled or at room temperature. For a gourmet touch, drizzle your bars with melted dark chocolate or a dusting of powdered cinnamon. A side of Greek yogurt or a handful of fresh berries complements thier wholesome texture beautifully. Pack them for picnics, lunchboxes, or as an afternoon pick-me-up paired with a cup of herbal tea or coffee.

| Nutrient | Per Bar (approx.) |
|---|---|
| Calories | 180 kcal |
| Protein | 5 g |
| Carbohydrates | 22 g |
| Fat | 8 g |
For more wholesome snack ideas, visit our Healthy Snacks Collection or learn about the science behind superfoods at british Nutrition foundation.
Q&A
Q&A: Your Go-To Guide for Simple & Tasty Homemade No-Bake Granola Bars
Q1: Why choose no-bake granola bars over baked ones?
A1: No-bake granola bars are a game-changer for busy bees and novice bakers alike. They save time,require no oven,and retain a wonderfully chewy texture that’s often lost in baking. Plus, they’re perfect for customizing with your favorite ingredients without the worry of overcooking.
Q2: What are the basic ingredients needed for no-bake granola bars?
A2: at the heart of any no-bake granola bar are oats and a sticky binder. Typically, rolled oats combine with natural nut butters (like peanut or almond butter), honey or maple syrup, and a pinch of salt. from there, you can add nuts, seeds, dried fruits, chocolate chips-the flavor world is your oyster!
Q3: How do I ensure the bars hold together without baking?
A3: The secret lies in the binder. Using enough nut butter and sweetener creates a sticky mixture that clings to the oats, while chilling the mixture in the fridge or freezer firms it up. Pressing the mixture firmly into your pan helps too-don’t be shy about packing it down tightly!
Q4: Can I make these granola bars vegan or allergy-friendly?
A4: Absolutely! Swap honey for maple syrup or agave nectar to keep it vegan.For nut allergies, sunflower seed butter or tahini work beautifully as choice binders. Feel free to mix and match to suit your dietary needs without sacrificing flavor.
Q5: What’s the best way to store homemade no-bake granola bars?
A5: Keep your bars airtight in the fridge for up to two weeks. For longer storage, wrap individual bars and freeze them-perfect for grab-and-go snacks that last for months. Just thaw a bar at room temperature before enjoying.
Q6: Any tips for adding flavors that pop?
A6: Spice it up with cinnamon, vanilla extract, or a pinch of sea salt to enhance sweetness. Mix in shredded coconut, chia seeds, dried berries, or even a swirl of dark chocolate for extra oomph.The key is balancing textures and tastes to keep every bite exciting.
Q7: How can I make my homemade granola bars healthier?
A7: Opt for natural, unprocessed ingredients-think raw nuts, seeds, and minimally sweetened dried fruit. Reduce added sugars by relying on natural sweeteners, and boost fiber and protein by tossing in flaxseeds or hemp hearts. It’s easy to nourish your body without compromising on yum.
Q8: Is this recipe kid-friendly?
A8: Definately! Kids love making their own snack bars because it’s hands-on and fun. The simple ingredients and no-bake method mean no hot ovens to worry about. Plus, it’s a sneaky way to pack in healthy ingredients disguised in a tasty treat.
With this Q&A, you’re all set to whip up your own batch of heavenly no-bake granola bars-simple, tasty, and oh-so-satisfying!
In Conclusion
Whipping up these simple and tasty no-bake granola bars at home proves that wholesome snacks don’t have to be complicated. With just a handful of ingredients and a sprinkle of creativity, you can customize each batch to suit your cravings and dietary needs-making healthy snacking not only convenient but genuinely enjoyable. So next time hunger strikes, skip the store-bought options and treat yourself to a homemade granola bar that’s as nourishing as it is delicious. Your taste buds-and your energy levels-will thank you!