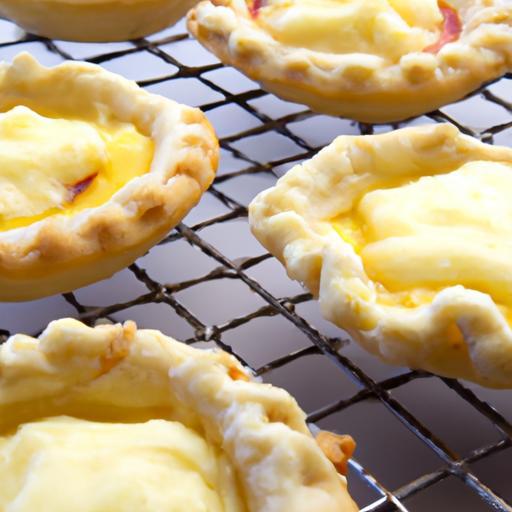
There’s something delightfully satisfying about a perfectly baked mini tart shell-teh golden, flaky crust that cradles luscious fillings, creating bite-sized masterpieces bursting wiht flavor. Whether you’re dreaming of tangy lemon curds, velvety chocolate ganaches, or fresh fruit and custard, the foundation of every exquisite tart begins with mastering the shell. But achieving that ideal balance of crispness and tenderness can feel like a culinary puzzle. Fear not! In this step-by-step baking guide, we’ll unravel the secrets to crafting flawless mini tart shells, turning your kitchen into a pastry haven and your dessert table into a gallery of edible art. Let’s dive in and discover how to build the perfect base for your sweet creations.
Perfect mini tart shells start with selecting the right ingredients and mastering essential dough techniques that guarantee a flaky, tender bite every time. Whether you’re aiming to impress at a dinner party or simply indulge in delicate, pastry perfection, understanding these fundamentals transforms your baking experience into an artful ritual.
Prep and Cook Time
- Preparation: 25 minutes
- Chilling: 1 hour
- Baking: 15-20 minutes
- Total: Approximately 1 hour 45 minutes
Yield
Makes 12 mini tart shells (3-inch diameter)
Difficulty Level
medium
Ingredients
- 1 1/4 cups all-purpose flour, sifted
- 1/2 cup unsalted butter, cold and cubed
- 1 tbsp granulated sugar (for slight sweetness)
- 1/4 tsp fine sea salt
- 1 large egg yolk
- 2-3 tbsp ice-cold water
- 1 tsp pure vanilla extract (optional, for subtle flavor)
- extra flour for dusting
Instructions
- Combine dry ingredients: In a large bowl, whisk together the sifted flour, sugar, and sea salt. This ensures even distribution of sweetness and salt,the backbone for a perfect tart shell.
- cut in the butter: add cold, cubed butter to the flour mixture. Using a pastry cutter or fingertips, gently work the butter into the flour until the mixture resembles coarse crumbs the size of small peas. The key to flakiness is those small, uneven butter pockets.
- Add wet ingredients: In a small bowl, whisk the egg yolk with vanilla extract and 2 tablespoons of ice water. Gradually add this to the flour mixture, folding gently with a spatula or your hands. Add a bit more water if the dough feels dry, but be careful not to overhydrate.
- Form the dough: Bring the mixture together into a rough ball, handling it minimally to avoid warming the butter. Flatten into a disk, wrap tightly in plastic wrap, and chill for at least 1 hour to relax gluten and firm up the fat.
- Roll out carefully: Lightly flour your work surface and rolling pin. Roll the dough to about 1/8-inch thickness, turning the dough every few rolls to maintain roundness and even thickness.Cut out circles slightly larger than your tart tins, gently pressing the dough into each mold without stretching.
- Shape and dock: Trim excess dough from edges neatly with a small knife or rolling pin edge. Use a fork to prick the base lightly (docking) to prevent puffing during baking.
- Blind bake setup: Preheat oven to 350°F (175°C). Line each tart shell with parchment paper or foil, then fill with pie weights, dried beans, or rice to keep the shape intact.
- Bake and cool: bake shells for 12-15 minutes until edges turn lightly golden. Remove weights and parchment then bake another 5 minutes until the bases set and appear dry but not overly browned. Cool entirely before filling.
Tips for Success
- Cold Butter Is Crucial: Butter should be just above freezing to form flaky layers that gently melt during baking.
- Rest Your Dough: Chilling allows the gluten strands to relax and the butter to solidify,which minimizes shrinkage and cracking.
- Avoid Overworking: Handle dough as little as possible to prevent toughness and preserve tenderness.
- Blind Bake wisely: Keep your weights evenly distributed and always use fresh parchment to avoid sticking.
- Use Tart Rings: For perfectly straight edges, tart rings assist with shaping, but mini tart pans with removable bottoms simplify release.
- Make Ahead: Shells can be baked,cooled,and stored airtight for up to 3 days or frozen for up to 1 month.
Serving Suggestions
Perfect mini tart shells are a versatile base for endless creativity. Fill with:
- Silky lemon curd topped with fresh berries and a dusting of powdered sugar.
- Rich chocolate ganache accented with a sprinkle of sea salt and toasted nuts.
- Bright frangipane with slices of stone fruit or seasonal figs glazed with apricot jam.
- light whipped cream and macerated strawberries for a classic summer treat.
Garnish elegantly with thin mint leaves, edible flowers, or a shimmer of gold leaf for a stunning presentation that delights both eyes and palate.
nutrition Information
| Per Tart Shell | Calories | Protein | Carbs | Fat |
|---|---|---|---|---|
| 1 shell (approx.) | 140 kcal | 2 g | 15 g | 7 g |
For a deeper dive into pastry essentials and dough science, visit the King Arthur Baking Guide.
Looking for more inspiration? Check out our Easy mini Tart Recipes for delectable ideas using these perfect mini tart shells.

Q&A
Q&A: Perfect Mini Tart Shells – step-by-Step Baking Guide
Q1: what makes a mini tart shell “perfect”?
A1: A perfect mini tart shell strikes a harmonious balance between crispness and tenderness. It should be sturdy enough to hold luscious fillings without crumbling, yet delicate enough to melt in your mouth.The ideal shell boasts a golden hue, even thickness, and a subtle buttery aroma that sets the stage for whatever decadent surprise you nestle inside.
Q2: Which type of flour is best for mini tart shells?
A2: For that silky, crumbly texture, all-purpose flour is your trusty sidekick. It provides enough structure without toughness.Some bakers like to blend in a touch of pastry flour for extra tenderness or even a sprinkle of almond flour for a hint of nuttiness. Remember: the flour you choose subtly shapes your shell’s personality!
Q3: Should I chill the dough before baking?
A3: Absolutely! Chilling is the secret handshake of great tart shells. It firms the butter back up, which helps create those flaky layers when it bakes. Plus, it prevents the dough from shrinking or warping in the oven. Aim for at least 30 minutes in the fridge-patience always tastes better.
Q4: How thinly should I roll out the dough?
A4: Aim for about 1/8-inch thickness. Too thick, and the shell can feel doughy and mask your filling’s flavor. Too thin, and it might crack or burn. A well-rolled dough provides the perfect delicate crunch without overwhelming your fillings.
Q5: Can I use tart weights or alternatives?
A5: tart weights are like your baking co-pilots, keeping the shell flat and even when blind baking. If you don’t have them, uncooked rice, dry beans, or even sugar can fill the bill. Just line your shell with parchment before adding weights to prevent sticking and ensure a flawless bake.
Q6: What’s the best way to prevent soggy bottoms?
A6: Blind baking is your best friend here. Partially or fully pre-bake your tart shells before filling to create a barrier against moisture. You can brush the shell with a thin layer of melted chocolate or beaten egg white for an extra shield if you’re filling with something notably juicy.
Q7: How long and at what temperature should I bake mini tart shells?
A7: Generally, mini tart shells prefer a cozy 350°F (175°C) for about 15-20 minutes. Keep an eye on color-golden edges and a firm touch signal readiness. Oven times vary, so don’t be shy about gently lifting a tartlet to peek underneath.
Q8: Any tips for releasing tart shells from their tins?
A8: Pat your tins with a little butter and dust with flour before filling, or use non-stick spray to help your miniature masterpieces slip away effortlessly. Allowing shells to cool slightly before unmolding keeps them intact and picture-perfect.
Q9: What fillings pair best with mini tart shells?
A9: The world’s your oyster! From silky chocolate ganache and fresh custards to zesty lemon curd and buttery fruit compotes, mini tart shells form a charming edible canvas. Their buttery foundation enhances both sweet and savory fillings alike-go ahead, experiment!
Q10: Can I prepare mini tart shells ahead of time?
A10: Yes! Bake your shells, let them cool completely, then store in an airtight container for up to 3 days. For longer storage, freeze them, well wrapped, for up to a month. Fill just before serving to maintain that crisp, irresistible texture.
Creating perfect mini tart shells is more art than science-and with this guide, you’re well on your path to baking brilliance. Happy tart crafting!
The Conclusion
Baking the perfect mini tart shells may seem like a small step, but it’s truly the foundation of any impressive tart creation. With this step-by-step guide in hand, you’re now equipped to craft delicate, buttery shells that hold your favourite fillings with grace and precision. Remember, patience and attention to detail transform simple dough into exquisite edible art. So, next time you set out to bake, embrace the process, trust your instincts, and let these mini tart shells be the canvas for your culinary creativity. Happy baking!