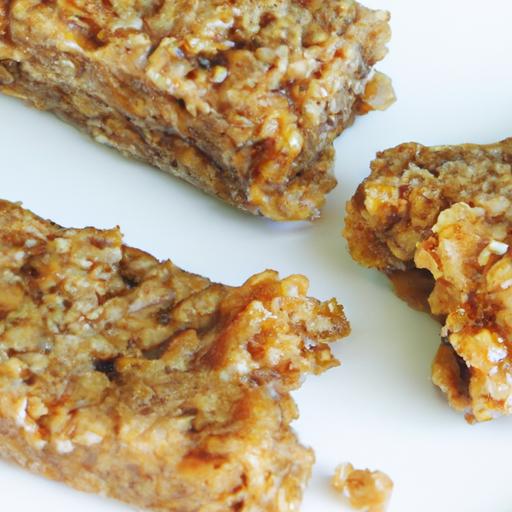
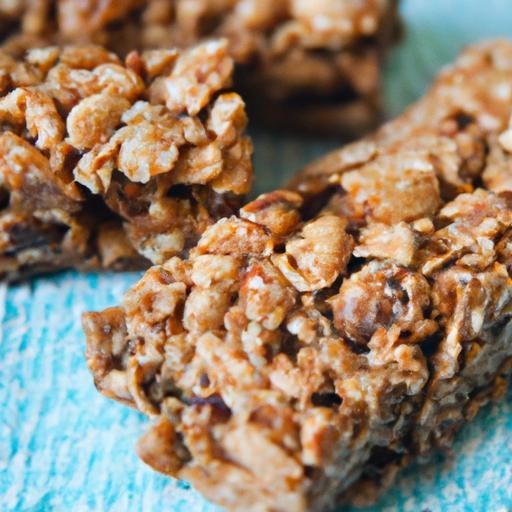
There’s something undeniably comforting about homemade snacks-especially when they’re as simple, nourishing, and delicious as no-bake granola bars.Packed with wholesome ingredients and free from unneeded additives, these bars are the perfect blend of chewy, crunchy, and naturally sweet. Whether you’re chasing an afternoon energy boost,fueling your morning adventures,or packing a fast snack for the kids,homemade no-bake granola bars offer a tasty and customizable solution that you’ll come back to again and again. In this article, we’ll explore why these bars are a kitchen must-have, share easy-to-follow recipes, and reveal tips to make your bars just as you love them-no oven required.Let’s dive into the world of wholesome homemade goodness you can feel good about eating!
Wholesome Homemade No-Bake Granola bars You’ll Love start with a thoughtfully crafted base that balances nutrition, texture, and irresistible flavor. These bars have become my go-to snack for busy mornings and afternoon pick-me-ups-thanks to their ease and wholesome ingredients that nourish and satisfy. Rooted in the idea that healthy eating should never compromise taste, this recipe harnesses natural sweetness and crunch without ever turning on the oven.
Prep and Cook Time
- Prep Time: 15 minutes
- Setting Time: 1 hour (no baking required)
- Total Time: 1 hour 15 minutes
Yield
Makes 12 bars (about 3×3 inches each)
Difficulty Level
Easy - perfect for all skill levels, including beginners
Ingredients
- 2 cups rolled oats (old-fashioned for best texture)
- 1 cup mixed nuts (chopped almonds, walnuts, and pecans)
- 1/2 cup natural peanut butter or almond butter
- 1/3 cup honey or pure maple syrup
- 1/4 cup flaxseed meal (adds fiber and omega-3s)
- 1/3 cup mini dark chocolate chips (optional but delicious!)
- 1/4 tsp fine sea salt
- 1 tsp pure vanilla extract
- 1/4 cup unsweetened shredded coconut (optional, for extra texture)
Instructions
- Prepare your pan: Line an 8×8-inch square baking dish with parchment paper, allowing excess to hang over edges for easy removal later.
- Toast the oats and nuts: In a large dry skillet over medium heat, toast the oats and chopped nuts until golden and fragrant-about 5-7 minutes-stirring frequently to prevent burning. This step intensifies flavor and improves crunch.
- mix the wet ingredients: In a medium microwave-safe bowl, gently warm the peanut butter and honey together for 20-30 seconds to reach a smooth, pourable consistency. Stir in vanilla extract and sea salt.
- Combine dry and wet: Transfer the toasted oats and nuts to a large mixing bowl. Add flaxseed meal, shredded coconut, and chocolate chips, then pour the peanut butter-honey mixture over them. Stir vigorously until all ingredients are evenly coated and sticky.
- Press the mixture firmly: Pour the granola mixture into the prepared pan. Using a piece of parchment paper or the back of a spatula, firmly press the mixture down to compact it as much as possible. this ensures bars hold together without baking.
- Chill and set: Refrigerate for at least 1 hour or until bars are firm to the touch. For a denser texture, freeze for 30 minutes, then thaw slightly before slicing.
- slice and enjoy: Lift the granola slab out using the parchment paper edges. cut into 12 bars using a sharp knife. store bars in an airtight container in the fridge for up to one week, or freeze for longer storage.
Chef’s Notes: Tips for Success
- Ingredient swaps: Feel free to replace nuts with your favorite seeds like pumpkin or sunflower for added nutrients and flavor variety.
- Sweetener options: Both honey and maple syrup work beautifully here; adjust quantity to taste for a lighter or richer sweetness.
- Adjusting texture: For softer bars, add a tablespoon of coconut oil or melted butter to the wet ingredients before mixing.
- Make-ahead: Granola bars keep well and improve in flavor after a day in the fridge-perfect for prepping a healthy week’s snacks in advance.
- Troubleshooting: If bars crumble too easily, press the mixture more firmly before chilling, or increase nut butter slightly to boost binding power.
Tasty Variations and Add-Ins
One of the joys of Wholesome Homemade No-Bake Granola Bars You’ll love is how easy they are to customize. Swap chocolate chips for dried cranberries, chopped dates, or seeds for a tangy or nutty twist. Add a pinch of cinnamon or a touch of espresso powder for depth. For a tropical vibe, include chopped dried mango and macadamia nuts. The base recipe welcomes your creativity while keeping health at the forefront.
Serving Suggestions
- Serve with a dollop of greek yogurt and fresh berries for a balanced breakfast.
- Wrap individual bars in parchment and pack with your lunch or hiking gear.
- Garnish with a drizzle of melted dark chocolate and a sprinkle of toasted coconut before slicing for a treat-worthy presentation.
- Pair with a warm cup of chai or green tea, highlighting the bars’ nutty and sweet profile.

| Nutrient | Per bar (1 of 12) |
|---|---|
| Calories | 180 kcal |
| Protein | 5 g |
| Carbohydrates | 22 g |
| Fat | 8 g |
For further inspiration, check out other no-bake snack recipes on our site. To learn more about the benefits of incorporating nuts and seeds into your diet, visit Harvard T.H.Chan School of Public Health.
Q&A
Q&A: Wholesome Homemade No-Bake Granola Bars You’ll Love
Q1: What makes these homemade no-bake granola bars different from store-bought ones?
A1: Unlike many store-bought granola bars packed with preservatives, artificial sweeteners, and hidden sugars, these homemade no-bake granola bars are crafted with wholesome, natural ingredients. You control the quality,flavor,and nutrition-no mystery additives,just pure goodness.
Q2: Why choose a no-bake recipe? Isn’t baking better for texture?
A2: No-bake granola bars are a game-changer for busy days or when you want something quick and fuss-free. They maintain a chewy, moist texture that’s delightfully satisfying, and they lock in the nutrition of raw ingredients better since there’s no heat to break down sensitive nutrients.
Q3: What are the key ingredients in these wholesome bars?
A3: At the heart of every bar lie whole rolled oats, nut butters (like almond or peanut butter), natural sweeteners such as honey or maple syrup, and a handful of mix-ins-think nuts, seeds, dried fruits, or even a sprinkle of dark chocolate chips. The magic happens when everything comes together in a sticky, luscious blend that holds tight without baking.
Q4: Can these bars be customized for different tastes or dietary needs?
A4: Absolutely! The beauty of making your own bars is the customization. Want gluten-free? Opt for certified gluten-free oats. Need a nut-free version? Swap nut butter for sunflower seed butter and add extra seeds. Craving a tropical twist? Toss in dried pineapple and coconut flakes. the recipe is your blank canvas.
Q5: How should these granola bars be stored, and how long do they last?
A5: for maximum freshness, store them in an airtight container at room temperature for up to a week. If you want them to last longer, pop the bars in the fridge, where they can stay fresh for about two weeks. You can also freeze them individually wrapped for up to three months-perfect for batch making.Q6: Are these granola bars truly “wholesome”? How nutritious are they?
A6: Yes! Made with whole ingredients, these bars offer a well-rounded mix of fiber-rich oats, healthy fats from nuts and seeds, natural sweetness, and protein to keep you energized. They’re a balanced snack that fuels your body and satisfies your sweet tooth without guilt.
Q7: What’s a fun tip to make the bar-making process even easier?
A7: Try mixing the ingredients in a large, zip-top bag! Add everything inside, seal it up, and use your hands to knead and combine the mixture. It’s mess-free,fun,and perfect for involving kids in the kitchen.Q8: Can these no-bake bars be made ahead for meal prep?
A8: Definitely! These bars hold up wonderfully over time, making them an excellent addition to your weekly meal prep routine. They’re grab-and-go, no reheating needed, so they’re perfect for busy mornings, mid-afternoon snacks, or post-workout fuel.Q9: How do I prevent the bars from falling apart?
A9: The secret is the sticky binder-nut butter combined with a natural sweetener like honey or maple syrup creates the glue holding everything together. Press the mixture firmly into the pan before chilling, and let them set well in the fridge to firm up.
Q10: Any creative serving ideas beyond eating them as bars?
A10: Sure! Crumble them on top of yogurt or smoothie bowls for added crunch, or chop into bite-sized pieces and sprinkle over salads for a nutty, sweet twist. They’re also great paired with a warm cup of tea or coffee for a cozy snack moment.
Ready to ditch the additives and embrace nourishing, no-fuss snacks? These wholesome homemade no-bake granola bars are your new best friend-simple, delicious, and endlessly adaptable!
Final Thoughts
With these wholesome homemade no-bake granola bars in your recipe repertoire, healthy snacking just became effortless and delicious. Whether you’re rushing out the door or need a comforting pick-me-up during the day, these bars deliver all the goodness without the oven’s heat. Packed with natural ingredients and customizable to your taste,they’re more than just snacks-they’re little bundles of energy and joy you can feel great about. So go ahead, mix, press, and chill your way to a batch of bars you-and anyone lucky enough to share them-will absolutely love. Your snack time just found its new best friend.